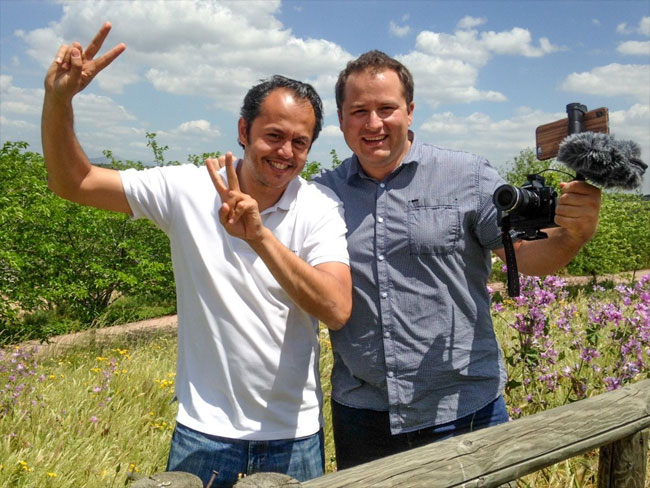
Few people will argue that the star of WordCamp Europe 2016 was PixelRockstar. More specifically, the stars of the event were Wapuu and the PixelRockstar team who walked around for a couple of days taking polaroid pictures of everyone.
It was a fantastic marketing ploy that caught the attention of everyone at the event.

PixelRockstar is a WordPress plugin that allows you to choose from over four million stock images and insert them directly into your website. The plugin has just been released, but should still be considered as in beta as they are looking to improve the service.
Co-founder Amos Struck was kind enough to send me a test copy of the plugin to let me try it out for you all. I hope you enjoy the review.
The PixelRockstar Story
PixelRockstar was founded by Alex Preukschat, Amos Struck, and Vita Valka.
Alex had been looking for a quick and effective way of inserting images into his website. This led him to meeting Amos as he was responsible for a solution called Microstock Photo Plugin. Microstock did not handle things the way Alex wanted, but after speaking to Amos at WordCamp Europe in Seville in 2015, they decided to work together and create a plugin together that did do what he wanted.
Amos has a background in stock images so it was a match made in heaven. In less than a year, PixelRockstar was launched and they took the following year’s European WordCamp by storm.
Vita is the last piece of the puzzle. He managed a Pixmac microstock agency and created many stock illustrations himself. He looks after the plugin and focuses on user-experience.
Why We Should All Be Using Stock Photos On Our Websites
PixelRockstar is a premium solution that requires you to pay a yearly fee.
If you are new to working online, you may be asking why would anyone pay for images when you can download images so easily from the internet from services such as Google Images. That is the question you should be asking.
What many new bloggers do not know is how risky it can be to use images on your website when you do not know where they came from.
Do not assume that you are permitted to use an image because you have seen it used on other websites. Those websites may have paid to use the image on their website or they may have copied the images from elsewhere without permission.
Copying an image from online and posting it online means that there is a chance that the author of the image, or the stock image company representing the author of the image, will come after you aggressively and sue you. This sounds like a worst-case doomsday scenario, however my friend Gerry received a letter from a stock image company after he uploaded an image to his football club’s blog and that website generates less than fifty visits per month.
No one is too big or too small for stock image companies. Their business model is based upon protecting their assets and they will go after anyone who uses their images and videos without permission.

Most experienced bloggers know that you cannot simply use any image you want.
However, what you may not know is that you could still get in trouble by using Creative Commons images found on Flickr and elsewhere.
When I sat down with Amos in Vienna and spoke to him about this I was genuinely surprised how wrong I had it.
I have used images from Flickr in the past on this blog and I have always displayed a credit link back to the owner of the image. I assumed that by following the Creative Commons license the image had been released under and giving credit where credit was due, then I would be fine.
That is unfortunately not the case.
You can still be taken to court if you use a Creative Commons image.
When someone takes a photograph and releases it through a service such as Flickr under a Creative Commons license, they are allowing others to use their photo as long as credit is given back to them (there are many different Creative Commons licenses but most of the images bloggers use ask for some sort of attribution).
Here’s the problem: When people upload their photos and release them under a Creative Commons license, they are not getting the explicit permission of everyone in the photograph. There may be people in the background who did not want their face to be seen or perhaps a company did not want their product used in the image. This could lead to you being sued for thousands of dollars, maybe even tens of thousands or hundreds of thousands.
When I spoke to Amos about this I said that I assumed that such a situation was highly unlikely, but he noted many incidents when website owners were taken to court and charged after using a Creative Commons image.
It is an alarming situation that can arise to anyone who was trying to follow the rules and do the right thing, however stock image companies have very little sympathy for people when they are protecting clients.
The bottom line is that we should all be using stock images on our websites.
How to Use PixelRockstar
PixelRockstar helps remedy this problem by introducing a straight-forward procedure for finding suitable images and inserting them into your website.
After you have installed and activated the PixelRockstar plugin, you should go to the plugin settings page that is located under your main admin settings area. Kudos to the development team for placing the settings area there and not overtaking my WordPress admin menu.
At the top of the page are username and password fields for you to enter your PixelRockstar login information.
Underneath there is an option to enable a test mode.
You can define the default image size that is downloaded, the caption that is used, and the alt text. The PixelRockstar button that is added to your post editor can be disabled from here too.
As long as you did not disable the PixelRockstar button, you will see the button when you edit a post, page, or custom post type.
PixelRockstar is located in the media library pop up window. You can reach the PixelRockstar images by clicking on the media button and then clicking on the PixelRockstar link at the top left-hand side. Clicking on the PixelRockstar button will take you there directly and save you a click.
Finding a suitable image with the PixelRockstar service works in the same way as searching for images in your media library. Simply enter a search term and related images will appear. There are over four million images available via the service so you never have to worry about not generating pages of results.
If you did not enter your login information in the settings area, you will see a message at the top right-hand side that states “You are no longer logged into PixelRockstar. Please log in now”. If you are logged in, you will see a message that states how many downloads you have left and when your membership expires.
There is also a feedback button that takes you directly to a feedback form on PixelRockstar’s website.
You will see a download button below each image. Hovering over an image will display more information about that particular image.
As I chose for the plugin to ask me every time what size of an image I want to use, when I click to download an image I am presented with three different image sizes: Low, medium, and super high. The resolution of each image size is displayed and you can choose to make any of those sizes standard for future downloads.
When you have confirmed the image size you want, the image will be added to your WordPress media library. You can now insert the image into your website from your media library at any time.
The title of the image will be automatically added to the article. I had initially set keywords as the alt text, though in hindsight using the image title makes more sense.
The copyright text “© PixelRockstar.com” was automatically added to my image as a caption since I had selected that option in the settings area. I could add additional text to any image and keep that copyright text. For example, I could have changed the caption from “© PixelRockstar.com” to “A beautiful panorama shot of the Stockholm Cityhall at dusk in Sweden. © PixelRockstar.com”.
Most news websites and high quality blogs clearly state the copyright of every image used on their website. Many embed the copyright directly into the image itself, though I’m pleased PixelRockstar does not do that. You could, of course, remove the copyright text altogether; however, I believe it makes sense to keep the copyright text there as it informs everyone that the image is being used legally.
The one thing missing from the plugin is the ability to rename the filename of the image. I would have liked to have had the option to have renamed the image file before it was downloaded into my media library.
The image I used above defaulted to castle.jpg, but I would have preferred an option to rename it myself or to use a more descriptive filename such as stockholm-cityhall-dusk-sweden.jpg. Hopefully this is something that will be added in a future version.
PixelRockstar lets you select one of three different image sizes when you download an image, however WordPress will automatically create three additional crops of the image for your designated thumbnail, medium, and large sized dimensions.
If you only have the option to insert the full image into your website, that means you have not defined your image sizes in WordPress.
To address this, all you have to do is go to the media settings page that is located under your main WordPress settings area i.e. http://www.yourwebsite.com/wp-admin/options-media.php. From there you can define what image sizes you want WordPress to generate whenever an image is uploaded.
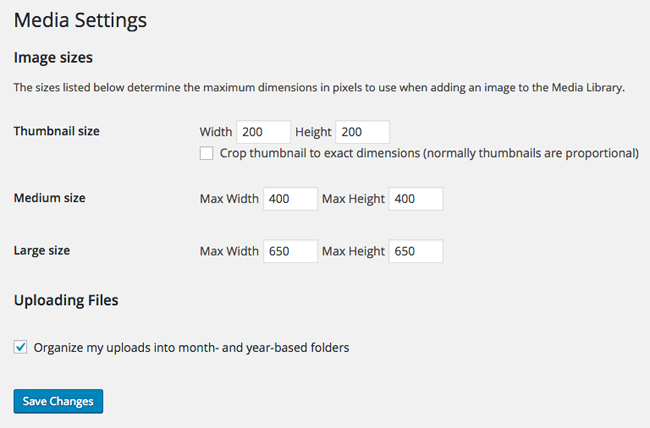
Once you have defined your image sizes in the media settings area, install the free WordPress plugin Regenerate Thumbnails and regenerate thumbnails for all images in your media library. You will then see all of the image sizes you defined when you insert the image into your content area.
Below is an example of how an image from PixelRockStar looks in an article.
I have broken down each step of using the plugin above so that you know how PixelRockstar works. What I perhaps did not convey is how quick the whole process is. When you need an image you simply search for an image using keywords, find an image you like, download it, then insert into your article.
This saves you a huge amount of time. Normally I need to find images, download them onto my computer, edit them to the correct size in Photoshop, and then upload them to my website.
The PixelRockstar plugin has only recently been released. The plugin is error-free and does exactly what it says it does. I do not want the plugin to become bloated in the future as the speed at which you can add images into content is one of its best selling points. There are however some ways in which I think it could be improved; such as the file renaming idea I mentioned earlier.
One feature I would like to see is some built-in optimisation options as the default file sizes can be quite large. The castle image I used as an example in this review was 1,193 × 556 pixels and 480kb in size. When I optimised that file in Photoshop the file size dropped to around 95KB.
There is a good argument that image optimisation should be handled by a dedicated solution such as Imagify, but if some kind of built-in image optimisation was offered to customers it would make PixelRockstar a more complete solution.
For example, after you have selected your image size, you could choose whether you import the full image size or optimise the image at 80% or 60% compression.
The argument against this process is that if you import an image at full resolution, you can downgrade the quality of the image later to reduce the file size but you cannot improve the quality of an image that has been downloaded in an optimised form. This wouldn’t be too much of an issue if the image you selected can be downloaded at full resolution at a later date without.
How Much Does PixelRockstar cost?
PixelRockstar offer three different license plans: Fan package, Rock package, and Star package. These retail at $9 per year, $35 per year, and $200 per year respectively.
The fan package gives you ten photos per year, the rock package gives you fifty images per year, and the star package gives you three hundred and fifty images per year. This price per image drops from ninety cents per image all the way down to fifty-seven cents per image when you opt for the most expensive plan. This is very competitive and makes PixelRockstar a great option for those of you have not found an alternative for Dollar Photo Club yet.
I would love to see an option to purchase images on an individual basis, but I appreciate that requires PixelRockStar to adopt a different business model. I also think there should be more pricing plans. At the very least one package priced between their rock and star packages would be welcomed and shouldn’t overwhelm customers with too many options.
When compared to other stock image services, PixelRockstar’s plans are extremely competitive. Their $35 per year plan that offers fifty images works out at $0.70 per image.
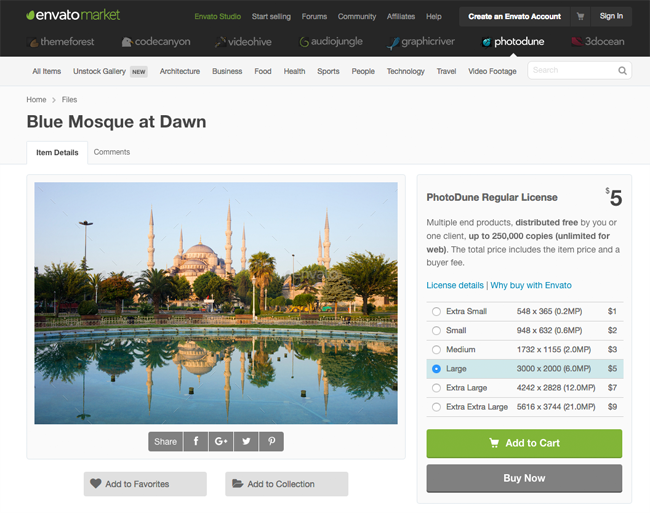
Envato’s stock image service PhotoDune charges much more. It will cost you $1 for a small image around 500 pixels and an extra large image with a resolution of over 5,000 pixels may cost you $9 or $10.
The increased price that services such as PhotoDune charge allow you to use the image in more situations, but if you only need images to add into articles you will be paying more money for something you will never use.
When I spoke to Amos I asked about what happened to any unused images. If I recall correctly, any unused images will be carried over to the next year if you renew again; however I will verify this with Amos to make sure that this is correct.
The license allows you to use images on your own website and by association through social media. Obviously, such a low price for stock images does not grant you permission to use images on t-shirts, posters, advertising etc.
Check out the PixelRockstar license agreement for full information on the terms on the service.
Final Thoughts
If you are looking for a way to add legal-safe images into your website, PixelRockstar is one of the best solutions available. Its simplicity is its best feature. You select an image you like, you insert it into your content, and then you move on.
Those of you who have never paid for images before may take a step back at the thought of paying for images, however in the long-term it is usually the smart move to do so because it means you do not run the risk of being sued.
I highly recommend checking them out.
Good luck.
Kevin