
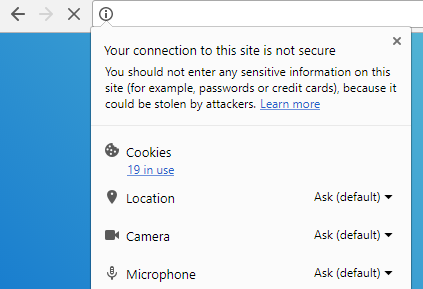
Is your website securely using HTTPS encryption?
If it isn’t, it should be.
HTTPS is the term used for Secure HTTP connections. It provides a safer and more secure connection for you and your website visitors. Each website that uses a HTTPS connection is issued an SSL (Secure Sockets Layer) certificate. If the website certificate does not match correctly with what should be there, the browser will warn the visitor.
Three years ago Google advised that HTTPS was now a ranking factor and it is apparently even more of a ranking factor today.
So in addition to creating a safer website, you can also increase your search engine presence and organic traffic by adopting an HTTPS connection.
In this tutorial I will show you how you can do that using Cloudflare.
Getting an SSL Certificate
Many hosting companies charge for providing an SSL certificate, though it is becoming more common for hosting companies to offer one with plans.
I personally use the website performance and security service Cloudflare as it offers a free SSL certificate. Their free plan also offers many other fantastic free tools such as a Content Delivery Network (CDN) to improve performance, security tools, and a range of apps from popular internet services.
If you are not using Cloudflare to provide an SSL connection, do not make any of the changes suggested in this tutorial. This tutorial is not for you.
How to Change Your WordPress URLs to HTTPS Using Cloudflare
Below you will find the exact steps I took to took to make KevinMuldoon.com secure. You can perform any of these steps in a different order, but you may find that your website will not work correctly temporarily.
Please be conscious of the specific changes you have made and refer back to this tutorial if you are unsure. Cloudflare sometimes takes a few minutes to perform changes (sometimes longer) and you will need to ensure you clear any cache to make sure those changes are being shown in your browser. You may have to clear browser cookies too.
It goes without saying that I accept no responsibility for your website going down temporarily or for your website acting weird, but don’t worry, this is not something to panic over. It should only take you a few minutes to perform these steps and you can simply reverse any changes you make if you are unsure.
If you are not confident about any of this, step away from your computer and ask your hosting company for help.
Please also note that this guide is specifically for setting up HTTPS with Cloudflare on WordPress (though it is worth mentioning that the process of using Cloudflare’s SSL certificates is generally easier with other platforms).
Step 1
First thing you need to do is install the free WordPress plugin Cloudflare Flexible SSL by iControlWP.
This plugin fixes the infinite redirect loops that will occur when using Flexible SSL.
Step 2
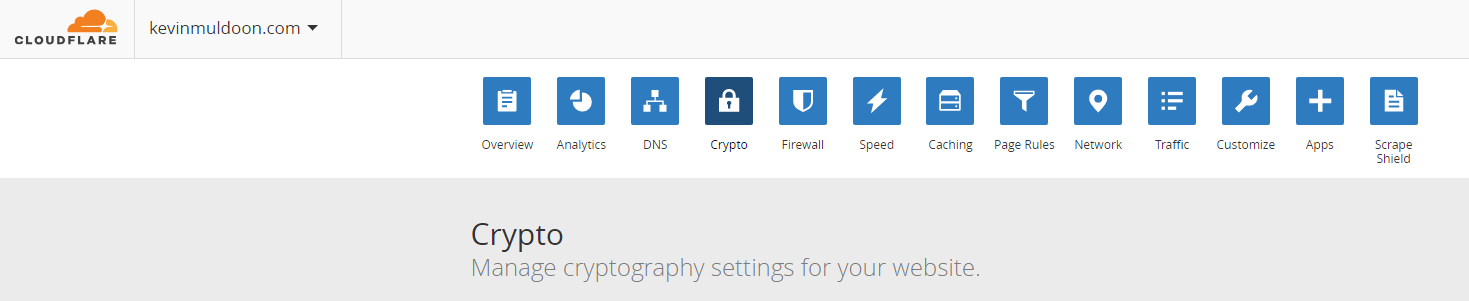
Next you need to login into Cloudflare and go to the Crypto page.
Step 3
In the SSL section, change the setting to Flexible (it was probably set to Off or Full previously).
Read “What do the SSL options mean?” on Cloudflare’s website for an understanding of what the available SSL settings mean.
Warning: If SSL is set to Flexible and Cloudflare Flexible SSL is not activated, your website will mess up. Be sure to change SSL back to Full if you ever need to deactivate Cloudflare Flexible SSL e.g. if you have deactivated all WordPress plugins in order to debug errors.

Step 4
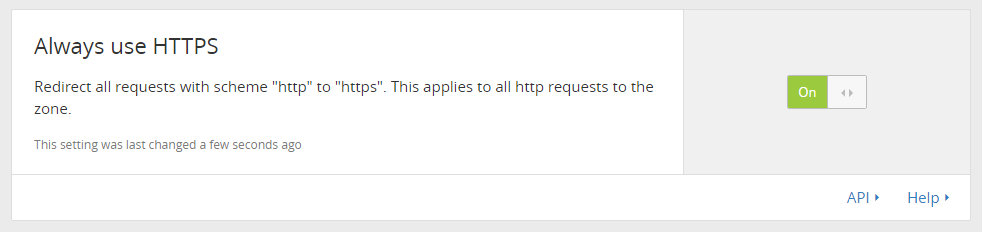
Scroll down to the section entitled “Always use HTTPS” and switch it on.
This redirects all HTTP requests to HTTPS.
Step 5
OK, this is the part of the tutorial where it gets a little tricky since the status of your website at this point will depend on how your website is setup.
I use WP Rocket to improve my website’s performance. When WP Rocket is enabled at this stage, my website has successfully changed from HTTP to HTTPS. Unfortunately, my website design was all messed up as parts of my design that were linked relatively were not displaying correctly.
To fix this problem, I opened the WP Rocket settings page and clicked on the Cloudflare tab.
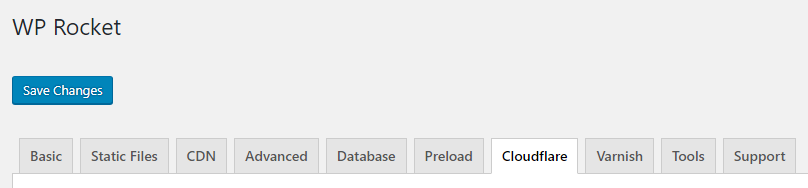
Then I ensured that Relative Protocol was switched on.
It is unlikely that you had this setting enabled previously as it is only required when using Cloudflare’s Flexible SSL connection.

At this point, my website was securely using HTTPS and it had no design issues. If you are using a different caching solution, you may have to enable a similar option.
Obviously, for the benefit of this tutorial, I had to test these steps for people who don’t use WP Rocket.
When I disabled WP Rocket, something bizarre happened.
I did not experience any design issues like I did when WP Rocket was enabled without Relative Protocol activated, however my website was no longer secure. My website URLs were using HTTPS, but my browser stated that the connected was insecure.
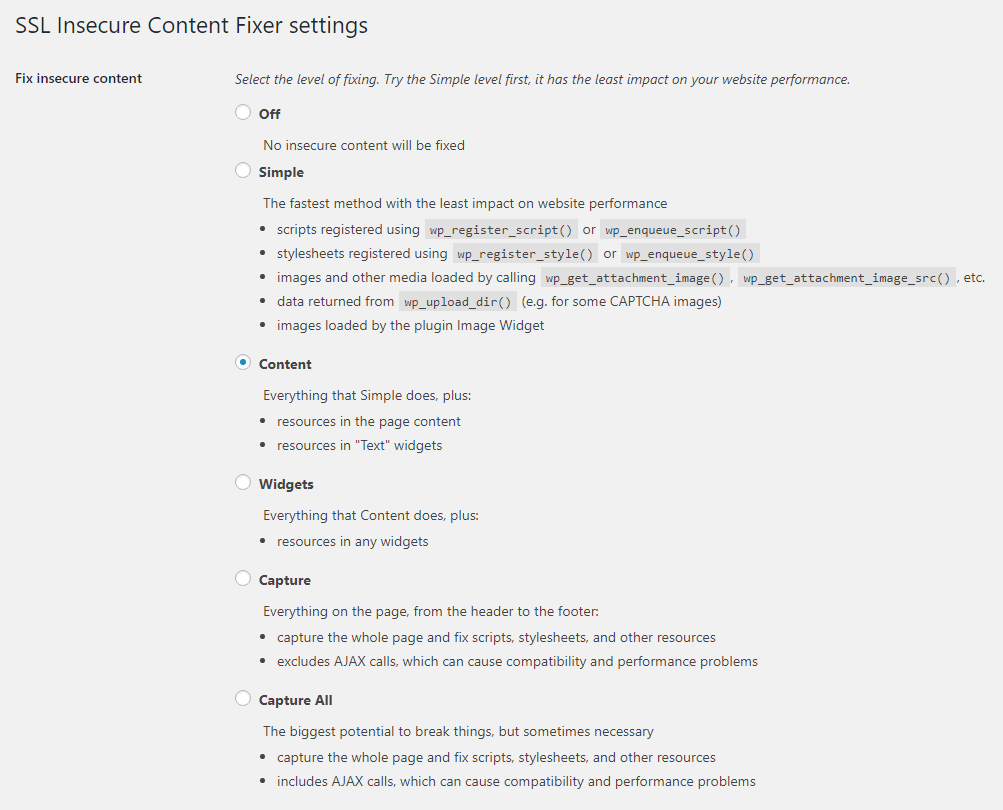
To fix this issue I installed the free WordPress plugin SSL Insecure Content Fixer. I selected the content setting and that fixed everything; though you may want to test all settings on your website to see which works best for you as some options may break something on your website.
With WP Rocket disabled, SSL Insecure Content Fixer was able to make my website fully HTTPS compliant.
You may have noticed that at no point during the steps did I recommend changing the WordPress Address (URL) or Site Address (URL) fields that are located in your WordPress general settings page.
Many guides suggest changing your website addresses from http://www.domain.com to https://www.domain.com (via the settings area or directly within your website database). This is not necessary when using Cloudflare and can actually cause a lot of problems.
If you made the mistake of changing your website address to HTTPS in the general WordPress settings area, change it back.
Troubleshooting
No part of the process of changing your WordPress website from HTTP to HTTPS using Cloudflare is difficult; however you may encounter a couple of setbacks along the way. It’s a case of trial and error to get things working.
If your browser is not showing what you think it should be, clear your browser cookies, login and logout of WordPress, and go back and revert the changes you made and then start again.
If you need further help, I highly recommend reading the article “WordPress Cloudflare Flexible SSL – Making It Work” by iControlWP (the same people who created the Cloudflare Flexible SSL plugin you need to use). It’s a good tutorial and there are lots of comments from WordPress users giving their own suggestions on how to get HTTPS working.
The Cloudflare article “How do I fix mixed content issues or the infinite redirect loop error after enabling Flexible SSL with WordPress?” also has some information you will find useful.
If you are still finding it difficult to get everything working, I encourage you to speak to your website hosting company.
Good luck.
Kevin
Hi Kelvin,
I followed the steps listed out in your article above. Cloudflare is now working on my website but i noticed i can’t login into my website / dashbaord.
Please i need your help/advice
I haven’ had any problems with it myself.
Hi Kevin, Great article.
I installed and activated the flexible SSL after reading this post, but I am a bit worried about the Cloudflare Flexible SSL plugin because I noticed that it hasn’t been updated since a year now… so do you think, it can be vulnerable? or it can cause any issues with the sites performance etc?
Please reply.
I have installed an SSL certificate on my WordPress website. The https url of my website is working, but it is not shown in green colour. when I click on the top icon in chrome, it shows your connection to this file is not fully secure
“Access denied” when testing HTTPS site in Google’s Structured Data Testing Tool after activation of Cloudflare SSL in my WordPress blog.
No not tried it. Was it released after I published this article?
Hello Kevin, did you try Force Https plugin?? https://wordpress.org/plugins/force-https-littlebizzy/
Hi David.
Truthfully, I don’t know. I haven’t tested it on multisite so I am not sure whether the steps are the same or whether Cloudflare handles it all in the same way.
My suggestion would be to test this first on a test installation of MU so that you aren’t doing anything risky with live websites.
Kevin
Hi Kevin,
Thanks for the great article. Quick question. I see your note about not changing the url in the “WordPress Address (URL) or Site Address (URL)” but what about if the site is a multisite install with domains mapped out? Does that rule still apply and would it only apply then to the primary domain? Thanks!
I am sure someone from the hosting industy could explain exactly why they charge, but I suspect it is because companies such as GlobalSign charge them for it. Don’t get me wrong, the hosting and domain industry do regularly charge for things they shouldn’t. For example, some domain name companies charge an admin fee for transferring away.
It is hard to believe why so many hosting company charges money for ssl certificate. Though I think one reason could be that those ssl providing by hosting company is more secure than free ssl certificate. Whats your take on this ?